Making drawRect: accessible
This week (actually yesterday) at Cocoa Heads Stockholm I had the pleasure of listening to a blind user talk about accessibility on iOS and to also give a presentation on accessibility myself. It was an extremely emotional experience to hear about the enabler that your app can really be for a disabled user. In the aim of spreading the word about VoiceOver I intend to write several posts explaining how to implement great accessibility in your apps, starting with this post.
For the most part, adding support for VoiceOver isn’t really that difficult. Setting appropriate labels and hints for your views goes a long way. Custom drawing however is less than the sound of crickets to a visually impaired user. Text that would otherwise be accessible just by being text is no longer accessible and if your custom drawing contains multiple elements there is no way to differentiate between them…
…or is it?
An accessibility container
The UIAccessibilityContainer protocol defines three methods that allow you to make your custom drawing accessible
accessibilityElementCountaccessibilityElementAtIndex:indexOfAccessibilityElement:
If the view with the custom drawing implements these three methods VoiceOver can know how many elements there are and in which order the should be. But what exactly is an accessibility element? This is not a class you usually see because every UIView is an accessibility element. But the custom drawing has no subviews, therefore we have to create the accessibility elements ourselves.
Implementing it is dead simple
By storing the accessibility elements in and normal NSArray (called accessibleElements in this example1) implementing the container protocol is as simple as looking up objects in the array. Being an accessibility container also requires the view to not be an accessibility element itself.
#pragma mark - Accessibility Container protocol

- (BOOL)isAccessibilityElement {
    return NO;
}

- (NSInteger)accessibilityElementCount {
    return [self.accessibleElements count];
}

- (id)accessibilityElementAtIndex:(NSInteger)index {
    return self.accessibleElements[index];
}

- (NSInteger)indexOfAccessibilityElement:(id)element {
    return [self.accessibleElements indexOfObject:element];
}
And accessibility elements
Looking closer at the UIAccessibilityElement class we see mostly familiar properties. It’s the usual label, value, hint and traits that we use to customize our views with to make them accessible. The two new things are
- initWithAccessibilityContainer:accessibilityFrame
The constructor should be obvious in the context of creating our own accessibility elements for an accessibility container. Let’s have a closer look at the documentation for the second one.
accessibilityFrame
The frame of the accessibility element, in screen coordinates.
That is actually it. The only thing we need to do to create an accessibility element for something other than a view is to give it a label and a frame. Note that the frame is in screen coordinates. Luckily UIKit has a method for doing this: convertRect:toView:. Just pass nil as the view to convert to.
So a quick recap and then we’ll look at some actual code.
To make our custom drawing accessible we need to know how many elements we want to make accessible and in what order they should appear. For each element we then need to know their label and frame and optionally hints, traits, etc. just like we do with normal views.
Inside drawRect:
When we do our custom drawing we have exact positioning of all the text, images and vector shapes that gets put into our drawing context.
Text
Text can be drawn inside our image context either in a rect or at a point. In either case NSString and NSAttributedString have methods to calculate the size of the drawn text, for example the size method on NSAttributedString. Given a point and a size it is easy to know the rect of the text and therefore we can create an accessibility element for it.
// Drawing the text
NSAttributedString *attributedString = [self attributedStringToDraw];
CGSize textSize = [attributedString size];
CGPoint textPoint = CGPointMake( ... ); // not important
[attributedString drawAtPoint:textPoint];

// Accessibility element for text
UIAccessibilityElement *textElement =
    [[UIAccessibilityElement alloc] initWithAccessibilityContainer:self];
textElement.accessibilityLabel = attributedString.string;
CGRect textFrame = CGRectMake(textPoint.x,
                              textPoint.y,
                              textSize.width,
                              textSize.height);
textElement.accessibilityFrame = [self convertRect:textFrame
                                            toView:nil];
Images
Images are commonly draw into a rect using drawInRect: so we already know the rect of the image. All we need is some label to describe the image to the user.
// Draw the image
UIImage *image = [UIImage imageNamed:@"accessibility-logo"];
CGRect imageRect = CGRectMake( ... ); // not important
[image drawInRect:imageRect];

// Accessibility element for the image
UIAccessibilityElement *imageElement =
    [[UIAccessibilityElement alloc] initWithAccessibilityContainer:self];
imageElement.accessibilityLabel = @"Accessibility logo";
imageElement.accessibilityFrame = [self convertRect:imageRect
                                             toView:nil];
Vector data
Knowing the frame of vector data seems tricky at first but Core Graphics gives you great help. If the data is in a CGPathRef then the frame containing the entire path (AKA the bounding box) can be retrieved using CGPathGetBoundingBox( path );. If, on the other hand the vector drawing consists of multiple shapes already being added to the graphics context then the bounding box for the path of the context can be retrieved using CGContextGetPathBoundingBox( context ); In either case we now know the frame and can create an accessibility element for it.
// The accessibility elements for a vector shape
UIAccessibilityElement *dElement =
    [[UIAccessibilityElement alloc] initWithAccessibilityContainer:self];
dElement.accessibilityLabel = @"D";
dElement.accessibilityHint = @"The letter D in the DR logo.";
dElement.accessibilityFrame =
    [self convertRect:CGPathGetBoundingBox(dPath)
               toView:nil];
The result
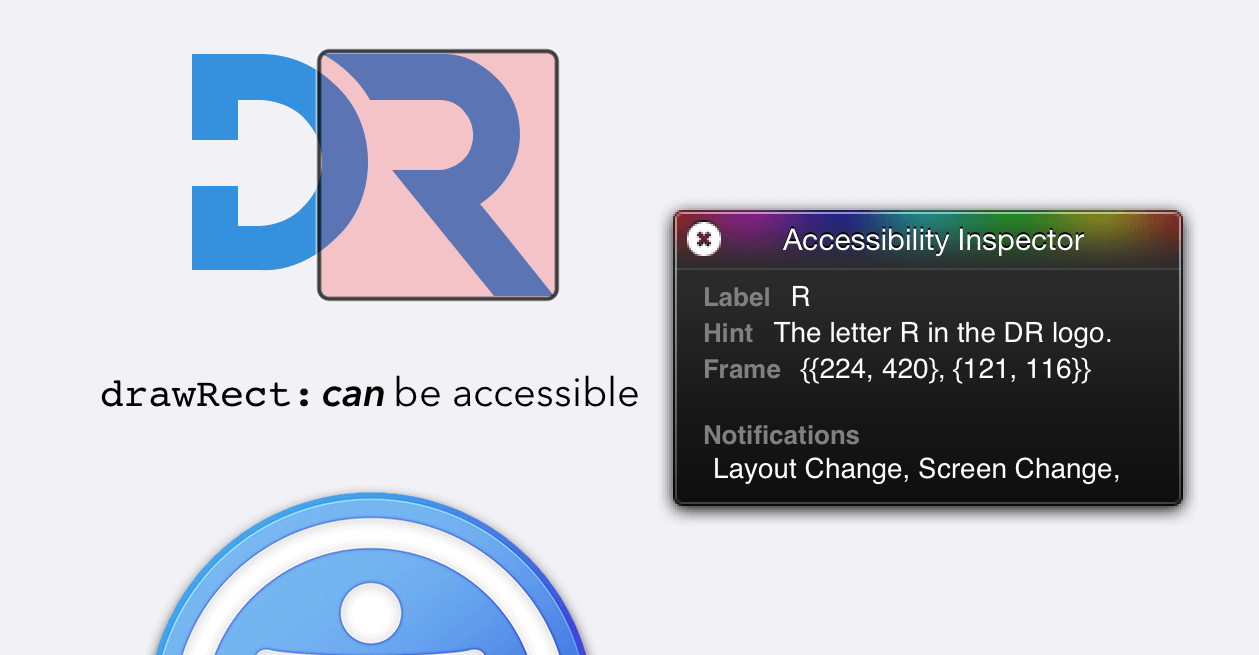
As seen in Figure 1 the content of our drawRect: implementation can be made accessible. Just like any other content.

The sample project seen above can be found on GitHub. Please look at the code and see how little work it is to make your custom drawings accessible as well.
-
You could call it anything you like but I feel that it is a good name for it. ↩